|
|
|
|
|
|
Review of WarDrivingWorld DIY Biquad Kit
author: Martin "mpot" Pot
published: 11 November 2006
This review looks at a DIY biquad antenna kit from WarDrivingWorld.com, for making
an 802.11b/g wireless networking antenna.
The contents of the kit are reviewed, and comments are provided on the
construction of the antenna.
The completed antenna is then tested and compared with several other biquad antennas.
Background
Several years ago, I published detailed instructions on building a biquad antenna
on my website.
The biquad is relatively easy to build yourself, and offers very good performance
for its size and complexity.
A biquad typically has a gain of 11dBi, with approximately 40 degree beamwidth.
It can be used as a standalone antenna, or it can be used as a feed on a larger dish.
While many people have used my instructions to build their
own biquad antennas, some people do not necessarily have the tools required to construct
these antennas, or do not know where to source the components required.
WarDrivingWorld.com is addressing
this by selling complete DIY kits for biquad antennas.
When I checked their eBay store,
they were selling these DIY biquad kits, complete with a 1.5m pigtail of your choice,
for US$22.95 plus US$5.50 postage and handling.
WarDrivingWorld sent me a kit to review, as they had previously asked if they could
distribute a printout of my Biquad Antenna Construction page with their kits.
The kit arrived in a USPS cardboard envelope with a US-based source address.
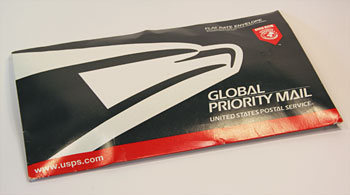
mail package
There was no additional padding in the envelope, but due to the relatively thick
cardboard construction, there is little chance of the kit getting damaged in the mail.
Also included in the envelope was this rather cheesy sticker promoting
the WarDrivingWorld website that sells these kits.

sticker and business card
The sticker is cheaply made, and was folded over to fit into the envelope,
and as a result, the lettering on the printed side stuck together.
Despite attempting to separate it carefully, the text was damaged
(the missing part of the last "d" of "WarDrivingWorld" is visible
just to the left of the first "W" of "WarDrivingWorld").
I have no idea why the sticker has a photo of Arnie on it...
Kit Contents
The WarDrivingWorld kit comes complete with all the parts required to build a biquad antenna,
and is neatly packaged in a sealed plastic bag.
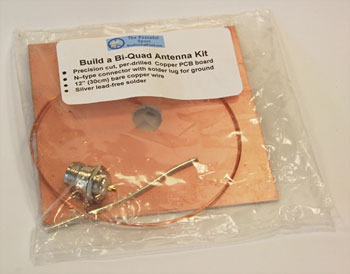
bag containing the kit
Contents of the bag are:
- pre-drilled copper PCB (123x123mm)
- female panel-mount N-connector with solder lug
- approx 350mm 2.5^mm copper wire
- short length of silver solder
Apparently these kits normally come with a 1.5m pigtail, but I did not receive
a pigtail with my kit.
Similarly, I did not receive any instructions, but apparently a printout of
my Biquad Antenna Construction page is normally included with
the kit (and is used with my permission).
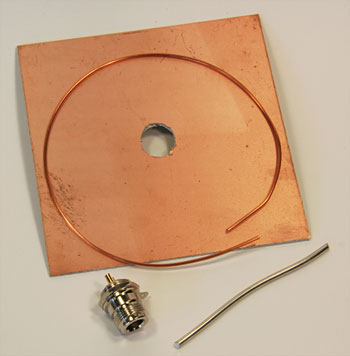
contents of the kit
The length of silver solder provided with the kit is lead-free. Apparently silver solder
is more conductive than tin/lead solder, due to its silver content, and produces
joints which can be upto 5-10 times stronger than joints made with tin/lead solder.
Silver solder also has a lower melting point than tin/lead solder, thus allowing it to
be used with less heat than similar tin/lead solder.
The copper PCB measures 123x123mm, and has a hole pre-drilled in the centre
for the N-connector.
The hole is not cleanly drilled - it has rough edges, and is not circular, and probably
is a little larger than is necessary.
However, the edges of the hole can be easily cleaned up with a round file
in a minute or two.
Construction
The copper surface of the PCB was cleaned up with some steel wool.
It is important to clean the copper surface around the hole in the centre of the
PCB, to ensure a good electrical connection when the N-connector is screwed
into place.
Also, aesthetically, a polished copper surface looks much nicer than an oxidised
surface. However, the copper surface will oxidise again, and will not retain
its polished appearance (unless it is sealed), but the oxidisation should have
no impact on the performance of the antenna.
As already mentioned, the burrs on the edges of the hole in the centre of the PCB
were removed with a small round file.
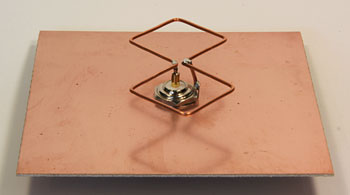
The copper wire was straightened, and then bent into the shape required for the
biquad element, with each side being as close to 30.5mm as possible.
(Refer to the Biquad Antenna Construction page for more details.)
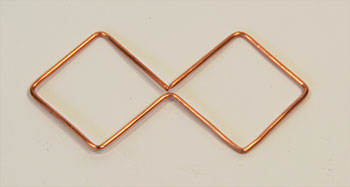
biquad element
The N-connector was inserted into the hole in the PCB, with the solder end on the
copper side of the PCB, and the N-connector end on the blank side of the PCB.
Note that I placed the washer with the solder lug on the copper side of the PCB too,
and bent the solder lug up at a 90 degree angle, to allow it to be used as an attachment
point for the element feed.
To build the biquad element feed, a short length of copper wire was soldered into the
centre post of the N-connector, and another was attached to the solder lug.
Once attached, these two wires were measured and trimmed at approx 14.5mm away from the
PCB copper surface (to ensure the biquad element would be 15mm away from the PCB).
I cut two pieces of wood 14.5mm thick, and used these to support the biquad element
while soldering it to the feed on the N-connector.
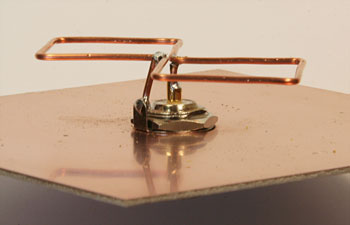
soldering the biquad element
The Biquad Antenna Construction page mentions the need for a shielded
feed to the biquad element (ie, the section between the biquad element and the PCB reflector).
However, the WarDrivingWorld kit only provides components for building a biquad with an unshielded feed.
An unshielded feed will radiate, and this will have a detrimental impact
on the antenna's performance.
(Refer to the test results below for more details on performance.)
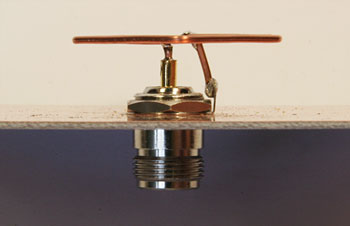
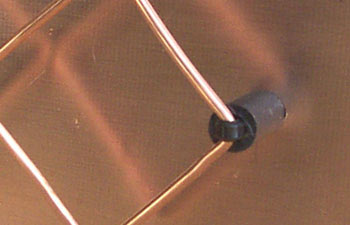
side view of element mounting detail
showing the solder lug attachment on the right
element mounting detail
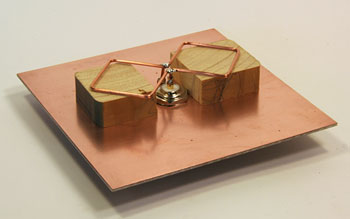
The resulting biquad antenna is somewhat fragile, as the biquad element can easily
be bent or knocked out of shape.
completed biquad antenna
This can be rectified by using a plastic spacer between the edges of the biquad element
and the PCB reflector, to securely hold the biquad element in place,
and to make the antenna much more robust.
I use plastic spacers, made out of a small section
of reticulation riser, with a small cable tie through it.
detail of plastic spacer
Note that the spacers can be made from almost any non-metallic (microwave-transparent)
material. If desired, hot-melt glue can be used to attach the spacers,
but be aware that the hot-melt glue will get very soft if you mount your biquad in direct sunlight.
Testing
To test the effectiveness of the WarDrivingWorld biquad, I compared its performance with
one of my martybugs biquad antennas, and with a
martybugs double biquad antenna.
Note that the martybugs biquad has a shielded feed, and has a slightly smaller PCB reflector
(110x110mm, while the WarDrivingWorld biquad has a 123x123mm biquad).
The smaller reflector is due to the fact that the martybugs biquad was originally built to be used as
a feed on a dish.
All antennas were tested by connecting them to an 30mW 802.11b Enterasys RoamAbout wireless PCMCIA
card in a laptop, with NetStumbler 0.4.0
being used to monitor signal, noise and SNR.
Firstly, all antennas were used to establish a connection to the 180 degree slotted waveguide
mounted on my roof
(a WAFreeNet AP called "SGNet"; which has
a Minitar MNWAPB access point), from a distance of approx 50m.
Test results for a client connection to SGNet:
|
antenna
|
SNR
(dB)
|
signal
(dBm)
|
noise
(dBm)
|
SNR diff
(dBm)
| |
martybugs biquad
|
47
|
-54
|
-101
|
| |
WarDrivingWorld biquad
|
46
|
-55
|
-101
|
-1
| |
martybugs double biquad
|
51
|
-51
|
-102
|
+4
|
A similar test was performed by establishing a client connection to
the 360 degree slotted waveguide on
ArmadaleAP, another
WAFreeNet access point,
approx 300m away (which has an Orinoco RG1000 access point).
Test results for a client connection to ArmadaleAP:
|
antenna
|
SNR
(dB)
|
signal
(dBm)
|
noise
(dBm)
|
SNR diff
(dBm)
| |
martybugs biquad
|
26
|
-73
|
-99
|
| |
WarDrivingWorld biquad
|
25
|
-76
|
-101
|
-1
| |
martybugs double biquad
|
28
|
-74
|
-102
|
+2
|
The test results indicate that the gain of the WarDrivingWorld biquad is about
1dBi less than that of the martybugs biquad.
This is due to the unshielded feed on the WarDrivingWorld biquad, while the martybugs biquad
has a shielded feed.
Note that the dB scale is logarithmic (where 3dBi is a doubling of signal strength),
and 1dBi is approximately equivalent to 25% of the signal.
Note that the martybugs biquad had a slightly smaller reflector (110x110mm instead of 123x123mm),
so the difference in performance between the two biquads may be slightly more than 1dBi
if a 123x123mm reflector were to be used on the martybugs biquad.
The gain of the double biquad has previously been measured as 2-3dBi higher than that of
the martybugs biquad (3dBi is a doubling of signal strength), and these test results confirm this.
Summary
This kit provides all the components required to allow you to build a biquad antenna
with minimal tools, and without having to source components from multiple sources.
While the biquad has a bare radiating feed, this has a relatively small impact on the performance
of the antenna (reducing the gain by about 1dBi down to approx 10dBi).
The bare feed is also simplifies antenna construction significantly.
This DIY biquad kit from WarDrivingWorld is also very good value.
At the time of writing, the kits were being sold on eBay for
US$22.95 + US$5.50 postage and handling, resulting in a total cost of approximately AUD$37.
I priced each of the components individually (all prices are in $AUD):
|
component
|
cost
| |
blank PCB (150x150mm)
|
$6.20
| |
female panel-mount N-connector
|
$5.00
| |
1 metre of 2.5mm^2 T&E power cable
|
$3.60
| |
pigtail
|
$25.00
| |
total
|
$39.90
|
Note that 1 metre of 2.5mm^2 twin&earth power cable (the minimum length most stores
will sell) will provide enough copper
wire for at 6 biquad elements, but the above prices assume a user wants to construct
a single biquad antenna.
If the cost of 1 metre of cable is distributed across 6 biquad antennas, the total cost
per antenna drops to AUD$36.90.
This confirms that the WarDrivingWorld biquad kit is certainly very good value for money.
It provides all the items required to build a biquad, and doesn't even require
any cutting or drilling, as the PCB is pre-cut to the correct size, and is pre-drilled.
The only tools required for constructing the WarDrivingWorld biquad
are a pair of pliers (for bending and cutting
the biquad element), and a soldering iron or gas torch to solder the element.
In summary, it's a useful kit that is very good value for money,
particularly for users who want to build a biquad with minimal effort.
The robustness of the antenna can easily be improved by the user with some plastic spacers,
and if required, the gain can be slightly increased by making a shielded feed
(but this will require additional components that are not included in the kit).
References
last updated 24 Mar 2026
|
|
|
|
|
|
|
|
|


