posted Saturday, 24 January 2015, 22:12 (+0800), by Martin
This is the thirteenth article in a
series on "understanding your camera"
that I am writing as I teach camera basics and camera operation to my children.

So what is exposure compensation, and why should photographers know about it?
The short answer is that exposure compensation allows you to adjust the default exposure selected by your camera, by several stops up or down.
Modern cameras have a lot of smarts built into their electronics, and are designed to make a lot of decisions about exposure and camera settings each time you take a photo. In most cases, the camera can make faster and smarter decisions than you can, and it is a good idea to take advantage of this processing power built into your camera.
Despite this, your camera cannot always correctly determine the exposure, because it makes some assumptions about the scene being photographed. There are situations where you need to be able to adjust the camera exposure up or down, depending on the scene being photographed, and the lighting conditions, to achieve the results that you want.
A camera will expose the scene to try to get an average of mid-tone grey, also known as middle grey. To the human eye, middle grey looks like it is about halfway between black and white. Middle grey is commonly referred to as 18% grey, because it reflects 18% of the light falling on it.

For many photos, exposing a scene for an average of 18% grey works fine. However, for photos that consist of mostly dark content, a camera will over-expose, and for photos consisting of mostly light content (such as snow, or a sunny day at the beach), the camera will under-expose. The camera does this because it is trying to get an average of mid-tone grey for the whole scene.
To demonstrate this, I took some photos of a white card and a black card. The cards are shown below, on the left hand side. The photos on the right hand side show what the camera will do when taking a photo of a completely black subject (the black card) and a completely white subject (the white card). When filling the frame with the black card, the camera attempts to expose for middle grey, and under-exposes the photo.
Similarly, when filling the frame with the white card, the camera over-exposes the photo, once again achieving middle grey.
Exposure compensation allows you to over-ride the camera's exposure, by telling the camera to over-expose or under-expose the scene by up to two stops away from the middle grey that your camera is trying to achieve. Cameras typically support at least two stops of exposure compensation in each direction.
This can be very useful in situations where exposing for middle grey will not result in the photo you are trying to take. This can either be because the average tone in the scene is lighter or darker than middle grey when using evaluative / matrix metering, or when the part of the scene being metered with spot metering or partial metering is lighter or darker than middle grey.
Most cameras allow you to adjust the exposure compensation up to two stops negative and up to two stops positive, with the adjustment done in either 1/2 or 1/3 stop increments. Some DSLR cameras allow for up to 3 or even 5 stops in each direction.
My primary camera is a Canon EOS 50D DSLR, and setting the exposure compensation on it is the same as on most of Canon's other EOS DSLR cameras:
Alternatively, you can also set the exposure compensation via the built-in menu system.
On the lower-end Canon cameras (the xxxD series) without a quick control dial, setting the exposure compensation is slightly trickier:
To cancel exposure compensation, follow the same process described above, and adjust the exposure level indicator on the camera's LCD screen back to the mid point.
Setting exposure compensation will cause the camera to adjust the exposure up or down, depending on the amount of exposure compensation that is set. As described in the exposure basics article, exposure is affected by aperture, shutter speed and ISO.
With the ISO fixed, setting aperture compensation will cause the camera to do the following:
Note that you can't use exposure compensation when your camera is in manual mode. This is because in manual mode, the exposure is set manually when you set the aperture and the shutter speed. Exposure compensation is then set by adjusting either the aperture or the shutter speed, and the exposure level meter will show how many stops over-exposed or under-exposed the exposure is from middle grey.
One stop of exposure compensation is equivalent to halving or doubling the exposure. That is, one stop of negative exposure compensation will result in the exposure being halved, and one stop of positive exposure compensation will result in the exposure being doubled.
The amount of exposure compensation required depends on how bright or how dark the scene is, and which metering mode you are using.
There is no hard and fast rule to determine how much exposure compensation is required. That is up to you as the photographer, to set the amount of positive or negative exposure compensation to achieve the exposure that you want.
One situation where exposure compensation is useful is shooting scenes that contain some bright or dark areas. For example, shooting a portrait where the background is very bright will typically result in the camera under-exposing the subject, because the camera is attempting to get an average-grey by under-exposing the bright highlights. I typically shoot in aperture priority mode (instead of manual mode), and use exposure compensation to adjust the exposure. In the left photo below, applying some positive exposure compensation in that situation allows the subject's face to be exposed correctly.

The right photo above was shot just after sunset. Without any exposure compensation, the camera would have exposed for middle grey. I wanted to capture the dark scene as it actually was, and dialled in two stops of negative exposure compensation, to prevent the camera over-exposing the scene.
Exposure compensation is also useful when using fill flash. For example, when shooting portraits outdoors with fill flash, I will normally shoot in aperture priority, dial in some negative exposure compensation (typically 2/3 to 1 stop) to slightly under-expose the background, and use fill flash to add some light on the subject.
On Canon cameras, the exposure compensation does not affect the flash exposure, but will only affect the ambient light exposure. To adjust flash exposure, assuming the flash or flashes are being used in ETTL mode, you can use flash exposure compensation.
(If the flash or flashes are being used in manual mode, then you will need to manually adjust the flash power of each flash, to obtain the desired exposure.)
On Nikon cameras, the flash exposure is affected by exposure compensation. Any exposure compensation will affect both the ambient light exposure and the flash output - so negative exposure compensation will reduce the flash output, and positive exposure compensation will increase the flash output.
Some Sony DSLR cameras are a little more flexible, allowing you to select whether exposure compensation will affect "Ambient & flash" or "Ambient only".
Choosing the best metering mode is important to consider too, because the metering mode determines how your camera will measure the scene being photographed, when determining the exposure. Refer to my post on metering modes for more details.
The default evaluative / matrix metering mode will cause the camera to meter the entire frame to determine the exposure required. When photographing a frame that contains a bright area (such as the left photo shown earlier), and you don't want the bright area to affect the metering, you should switch to spot metering, which causes the camera to use a much smaller portion of the frame (such as the face) to determine the exposure.
When using spot metering to meter off someone's skin, you typically want to over-expose by about one stop to get the right exposure, as skin is typically lighter than middle grey (depending on the nationality/race of the person).
Exposure compensation allows you to over-ride the exposure determined by the camera. This is particularly useful when photographing bright scenes that the camera might under-expose (snow / beach sand / etc), dark scenes that the camera might over-expose, or for bright backgrounds, where the camera may under-expose the foreground (rear-lit subjects).
Note that any exposure compensation setting will remain, even after powering the camera off. Be sure to check the exposure compensation setting each time you pull your camera out, to ensure you can reset any exposure compensation that may still be set.
Recently, a friend was wondering why her DSLR camera was under-exposing every photo, until I pointed out that she had two stops of negative exposure compensation set!
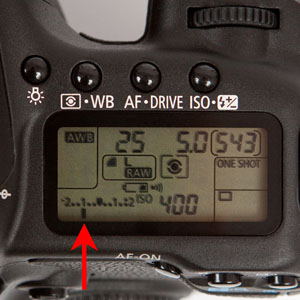
exposure level indicator on a Canon 50D DSLR
What is Exposure Compensation?
So what is exposure compensation, and why should photographers know about it?
The short answer is that exposure compensation allows you to adjust the default exposure selected by your camera, by several stops up or down.
Modern cameras have a lot of smarts built into their electronics, and are designed to make a lot of decisions about exposure and camera settings each time you take a photo. In most cases, the camera can make faster and smarter decisions than you can, and it is a good idea to take advantage of this processing power built into your camera.
Despite this, your camera cannot always correctly determine the exposure, because it makes some assumptions about the scene being photographed. There are situations where you need to be able to adjust the camera exposure up or down, depending on the scene being photographed, and the lighting conditions, to achieve the results that you want.
Middle Grey
A camera will expose the scene to try to get an average of mid-tone grey, also known as middle grey. To the human eye, middle grey looks like it is about halfway between black and white. Middle grey is commonly referred to as 18% grey, because it reflects 18% of the light falling on it.
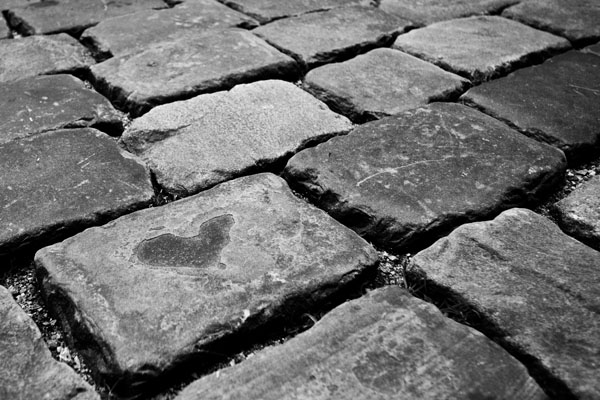
a black and white photo, with tones ranging from white through to black
middle grey, the result if you average the tones
For many photos, exposing a scene for an average of 18% grey works fine. However, for photos that consist of mostly dark content, a camera will over-expose, and for photos consisting of mostly light content (such as snow, or a sunny day at the beach), the camera will under-expose. The camera does this because it is trying to get an average of mid-tone grey for the whole scene.
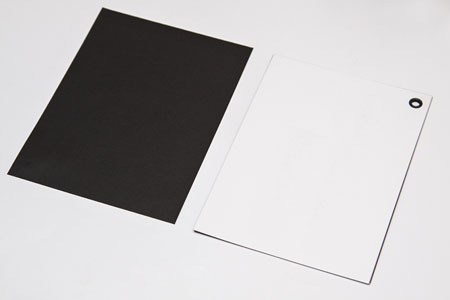
To demonstrate this, I took some photos of a white card and a black card. The cards are shown below, on the left hand side. The photos on the right hand side show what the camera will do when taking a photo of a completely black subject (the black card) and a completely white subject (the white card). When filling the frame with the black card, the camera attempts to expose for middle grey, and under-exposes the photo.
Similarly, when filling the frame with the white card, the camera over-exposes the photo, once again achieving middle grey.
|

|

|
left: black and white cards, right: the results when filling the frame with the black card or white card
Correcting Exposure with Exposure Compensation
Exposure compensation allows you to over-ride the camera's exposure, by telling the camera to over-expose or under-expose the scene by up to two stops away from the middle grey that your camera is trying to achieve. Cameras typically support at least two stops of exposure compensation in each direction.
This can be very useful in situations where exposing for middle grey will not result in the photo you are trying to take. This can either be because the average tone in the scene is lighter or darker than middle grey when using evaluative / matrix metering, or when the part of the scene being metered with spot metering or partial metering is lighter or darker than middle grey.
Setting Exposure Compensation on your Camera
Most cameras allow you to adjust the exposure compensation up to two stops negative and up to two stops positive, with the adjustment done in either 1/2 or 1/3 stop increments. Some DSLR cameras allow for up to 3 or even 5 stops in each direction.
My primary camera is a Canon EOS 50D DSLR, and setting the exposure compensation on it is the same as on most of Canon's other EOS DSLR cameras:
- half-press the shutter button to get the camera to calculate the exposure
- within 4 seconds, turn the quick control dial (the large dial on the rear of the camera)
Alternatively, you can also set the exposure compensation via the built-in menu system.
On the lower-end Canon cameras (the xxxD series) without a quick control dial, setting the exposure compensation is slightly trickier:
- half-press the shutter button to get the camera to calculate the exposure
- hold down the Av button, and turn the main dial
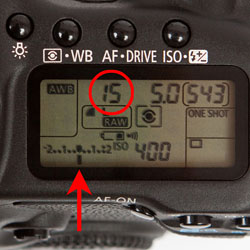
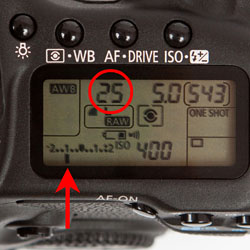
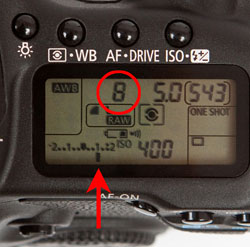
exposure level indicator (arrowed at lower left of the LCD screen) on a Canon EOS 50D's top LCD,
showing exposure compensation values of (from left to right): zero, negative 1 stop, positive 1 stop
showing exposure compensation values of (from left to right): zero, negative 1 stop, positive 1 stop
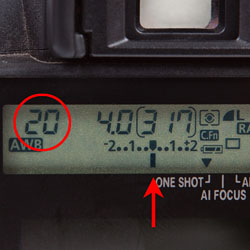
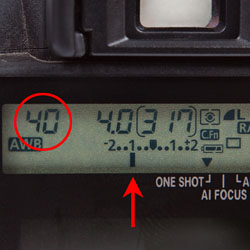
exposure level indicator (arrowed) on a Canon EOS 350D's rear LCD,
showing exposure compensation values of (from left to right): zero, negative 1 stop
showing exposure compensation values of (from left to right): zero, negative 1 stop
Cancelling Exposure Compensation
To cancel exposure compensation, follow the same process described above, and adjust the exposure level indicator on the camera's LCD screen back to the mid point.
Impact of Setting Exposure Compensation
Setting exposure compensation will cause the camera to adjust the exposure up or down, depending on the amount of exposure compensation that is set. As described in the exposure basics article, exposure is affected by aperture, shutter speed and ISO.
With the ISO fixed, setting aperture compensation will cause the camera to do the following:
- in aperture priority mode (Av), the camera will adjust the shutter speed to adjust the exposure
- in shutter priority mode (Tv), the camera will adjust the aperture to adjust the exposure
- in program mode, the camera may adjust both the aperture and shutter speed to adjust the exposure
Note that you can't use exposure compensation when your camera is in manual mode. This is because in manual mode, the exposure is set manually when you set the aperture and the shutter speed. Exposure compensation is then set by adjusting either the aperture or the shutter speed, and the exposure level meter will show how many stops over-exposed or under-exposed the exposure is from middle grey.
How Much Exposure Compensation is Enough?
One stop of exposure compensation is equivalent to halving or doubling the exposure. That is, one stop of negative exposure compensation will result in the exposure being halved, and one stop of positive exposure compensation will result in the exposure being doubled.
The amount of exposure compensation required depends on how bright or how dark the scene is, and which metering mode you are using.
There is no hard and fast rule to determine how much exposure compensation is required. That is up to you as the photographer, to set the amount of positive or negative exposure compensation to achieve the exposure that you want.
Some Typical Usage Scenarios
One situation where exposure compensation is useful is shooting scenes that contain some bright or dark areas. For example, shooting a portrait where the background is very bright will typically result in the camera under-exposing the subject, because the camera is attempting to get an average-grey by under-exposing the bright highlights. I typically shoot in aperture priority mode (instead of manual mode), and use exposure compensation to adjust the exposure. In the left photo below, applying some positive exposure compensation in that situation allows the subject's face to be exposed correctly.
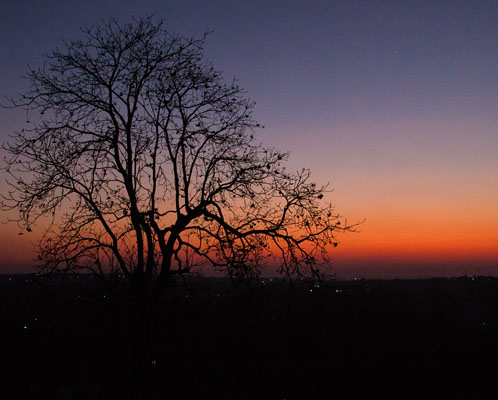
The right photo above was shot just after sunset. Without any exposure compensation, the camera would have exposed for middle grey. I wanted to capture the dark scene as it actually was, and dialled in two stops of negative exposure compensation, to prevent the camera over-exposing the scene.
Exposure compensation is also useful when using fill flash. For example, when shooting portraits outdoors with fill flash, I will normally shoot in aperture priority, dial in some negative exposure compensation (typically 2/3 to 1 stop) to slightly under-expose the background, and use fill flash to add some light on the subject.
Exposure Compensation and Flash
On Canon cameras, the exposure compensation does not affect the flash exposure, but will only affect the ambient light exposure. To adjust flash exposure, assuming the flash or flashes are being used in ETTL mode, you can use flash exposure compensation.
(If the flash or flashes are being used in manual mode, then you will need to manually adjust the flash power of each flash, to obtain the desired exposure.)
On Nikon cameras, the flash exposure is affected by exposure compensation. Any exposure compensation will affect both the ambient light exposure and the flash output - so negative exposure compensation will reduce the flash output, and positive exposure compensation will increase the flash output.
Some Sony DSLR cameras are a little more flexible, allowing you to select whether exposure compensation will affect "Ambient & flash" or "Ambient only".
Metering Modes and Exposure
Choosing the best metering mode is important to consider too, because the metering mode determines how your camera will measure the scene being photographed, when determining the exposure. Refer to my post on metering modes for more details.
The default evaluative / matrix metering mode will cause the camera to meter the entire frame to determine the exposure required. When photographing a frame that contains a bright area (such as the left photo shown earlier), and you don't want the bright area to affect the metering, you should switch to spot metering, which causes the camera to use a much smaller portion of the frame (such as the face) to determine the exposure.
When using spot metering to meter off someone's skin, you typically want to over-expose by about one stop to get the right exposure, as skin is typically lighter than middle grey (depending on the nationality/race of the person).
Exposure Compensation summary
Exposure compensation allows you to over-ride the exposure determined by the camera. This is particularly useful when photographing bright scenes that the camera might under-expose (snow / beach sand / etc), dark scenes that the camera might over-expose, or for bright backgrounds, where the camera may under-expose the foreground (rear-lit subjects).
A Word of Caution
Note that any exposure compensation setting will remain, even after powering the camera off. Be sure to check the exposure compensation setting each time you pull your camera out, to ensure you can reset any exposure compensation that may still be set.
Recently, a friend was wondering why her DSLR camera was under-exposing every photo, until I pointed out that she had two stops of negative exposure compensation set!


