|
posted Friday, 10 March 2017, 21:05 (+0800), by Martin
This is the fourteenth article in a
series on "understanding your camera"
that I am writing as I teach camera basics and camera operation to my children.

Here is a very practical example demonstrating why it is important to understand your camera.
As previously described in a blog post about
exposure compensation,
a camera will expose the scene to try to get an average of mid-tone grey, also known as middle grey.
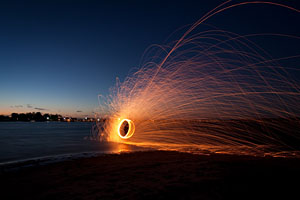
Photo #1 (below) was taken with my phone (Sony Xperia Z3 Compact) at the beach at sunset,
wtih the phone's camera in full auto mode.
As expected, the camera over-exposed the dark sky as it tried to get the average exposre to middle grey.
This does not capture the scene as the human eye saw it, and the sunset colours are lost in the background.
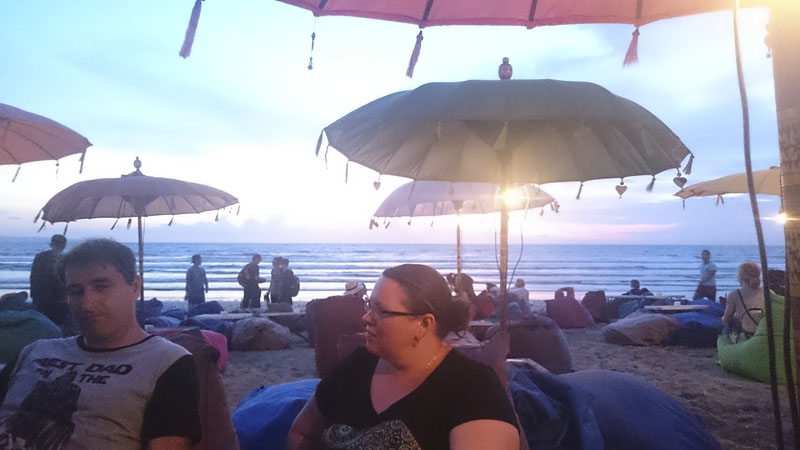
photo #1: photo taken with camera in auto mode
By changing to manual mode, and dialling in two
stops
of negative
exposure compensation,
I was able to capture photo #2 (below).
This is much closer to what the human eye was seeing, and has captured the awesome sunset colours
much better than photo #1.

photo #2: photo taken in manual mode, with 2 stops of -ve exposure compensation
By understanding what the camera is doing (attempting to expose for an average of middle grey),
and applying some negative exposure compensation, I was quickly and easily able to
get a much better photo of the sunset.
posted Saturday, 24 January 2015, 22:12 (+0800), by Martin
This is the thirteenth article in a
series on "understanding your camera"
that I am writing as I teach camera basics and camera operation to my children.

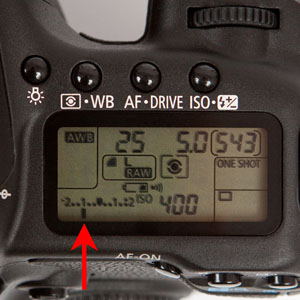
exposure level indicator on a Canon 50D DSLR
What is Exposure Compensation?
So what is exposure compensation, and why should photographers know about it?
The short answer is that exposure compensation allows you to adjust the default
exposure
selected by your camera, by several stops up or down.
Modern cameras have a lot of smarts built into their electronics, and are designed to make a lot of
decisions about
exposure
and camera settings each time you take a photo.
In most cases, the camera can make faster and smarter decisions than you can,
and it is a good idea to
take advantage
of this processing power built into your camera.
Despite this, your camera cannot always correctly determine the
exposure,
because it makes some assumptions about the scene being photographed.
There are situations where you need to be able to adjust the camera
exposure up or down, depending on the scene being photographed, and the
lighting conditions, to achieve the results that you want.
posted Wednesday, 12 March 2014, 21:28 (+0800), by Martin
This is the twelfth article in a
series on "understanding your camera"
that I am writing as I teach camera basics and camera operation to my children.
Definitions
A 35mm film camera uses a film roll where each exposure is 36mm wide and 24mm high.
A full frame digital camera body mimics this exposure size, and has a digital sensor that is the same size
as the 35mm exposure.
This allows lenses designed for 35mm film cameras to be used on a full frame digital camera
and still provide the same
field of view as on a 35mm film camera.
A crop body is a digital camera which has a smaller sensor, which only "sees"
a portion of the field of view, making it look like you are closer to the subject being photographed.
That means for a given distance between the camera and the subject being photographed, a crop body
has a smaller
field of view
and a smaller angle of view than a full frame camera body.
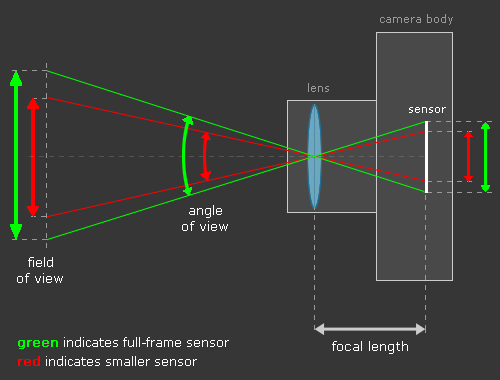
full frame sensor vs smaller sensor and the impact on field of view (top view)
Impact of Sensor Size
The smaller sensor in a crop body has an impact on the
field of view,
with an apparent magnification of the
focal length.
This causes the effective focal length of a lens to be longer than the actual focal length,
ie, the effective focal length of a given lens on a crop body is longer than the same
lens is on a full frame body.
The minimum focus distance of a lens is not impacted by the size of a camera's sensor.
The aperture
of a lens is not affected, but the
depth of field
for a given aperture is shallower on a full frame sensor than on a crop sensor.
This is because with equivalent fields of view, a crop camera has a shorter
distance to the subject than a full frame camera, and
the distance between camera and subject is one of the factors affecting
depth of field.
posted Wednesday, 18 December 2013, 22:54 (+0800), by Martin

Introduction
This post provides a summary of each of the articles in a series that I am writing
as I teach camera basics and camera operation to my children, in particular
to my (then) 11 year old son who wants to buy his first DSLR.
My children have
been
using
cameras
for a while (with some
good results),
but typically use full-auto mode, or rely on me to adjust the settings for them.
I thought it would be worthwhile to write a series of blog posts on this subject,
to help other people who might be interested, and because one of the best ways
to ensure you understand something is to try to explain it to others.
I am intending to publish more articles in this series in the future,
and will update this post with details as additional articles are published.
Articles in this Series
- Understanding Your Camera: Exposure Basics
This introductory article covers the basics of exposure, as well as a description of aperture, shutter speed
and ISO, and the impact of varying each of these. The relationship between aperture, shutter speed and ISO is also described.
- Understanding Your Camera: Lens Aperture Demystified
This article discusses aperture in more detail, describing the mathematics behind aperture f-stops,
and the effect of aperture on depth-of-field in your photography.
A number of common aperture-related terms are explained.
- Understanding Your Camera: Explaining ISO
Historically, ISO refers to the numerical scale used to measure the sensitivity of photographic film to light.
The ISO scale is described, as well as the impact of varying the ISO, and some recommendations on selecting an ISO setting.
a 5 second shutter speed captures
the trails of the sparks
- Understanding Your Camera: Shutter Speed
The third factor affecting exposure, the impact of varying the shutter speed is described.
Sample photos using fast and slow shutter speeds demonstrate this impact, the mathematics
behind the shutter speed scale is briefly covered, and some guidance is provided on using
longer shutter speeds, including bulb exposure.
Some information about interpreting how your camera displays the shutter speed is also covered,
along with recommendations on selecting shutter speeds.
- Understanding Your Camera: Focal Length, Field of View and Angle of View Defined
A slight deviation, this post provides definitions and descriptions of some key concepts, namely
focal length, angle of view and field of view. Diagrams are used to more clearly explain each of these terms.
- Understanding Your Camera: F-Numbers, F-Stops and Stops
Continuing with definitions, this article covers f-numbers and f-stops, detailing exactly what a "stop" is,
and the use of fractional stops.
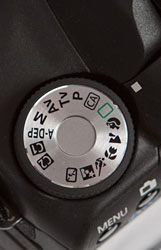
camera mode dial
- Understanding Your Camera: Camera Modes Explained
Confused by the various modes on your camera dial? In this article, each of the modes is described,
along with details of the situations in which each mode would typically be used.
- Understanding Your Camera: The Manual Mode Myth
Many photographers believe you are not a photographer unless you always use manual mode on your camera.
This article explores using manual mode vs using the smart electronics in your camera, and concludes
that the believe that you have to always use manual mode is a myth.
The use of manual mode is not completely discounted, as there are still situations where it is appropriate to use.
- Understanding Your Camera: Depth of Field
An important concept, depth of field is defined, and the factors which affect the depth of field are described.
This equips you with the knowledge to be able to control the depth of field in your photos.
- Understanding Your Camera: Revisiting Focal Length
Revisiting a concept previously covered, this article provides some more detailed information on the definition
of focal length, including how the effect of focusing impacts the focal point.

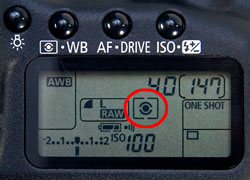
evaluative
metering
- Understanding Your Camera: Metering Modes
Understanding the various metering modes that your camera supports is important in knowing which
metering mode should be used in different situations.
Each of the metering modes is described, along with recommendations on situations when it should be used.
- Understanding Your Camera: Crop Sensors vs Full Frame Sensors
Confused about the differences between a crop sensor and a full frame sensor, and the pros and cons of each?
This article explains the differences, as well as the benefits and limitations of a camera body with a crop sensor
vs a full frame camera.
- Understanding Your Camera: Exposure Compensation
Exposure compensation allows you to adjust the default exposure selected by your camera, by several stops up or down.
There are situations where you need to be able to adjust the camera exposure up or down, depending on the scene being photographed,
and the lighting conditions, to achieve the results that you want.
This article describes how to use exposure compensation, and walks through several situations where it is useful.
- The Importance of Understanding Your Camera: A Practical Example
A practical example to demonstrate how understanding your camera's behaviour to expose for mid-grey,
and how to apply some negative exposure compensation allowed me to capture photos of a sunset at the beach.
This post will be updated as additional posts in this series are published.
You can subscribe to the RSS feed to be notified whenever a new post is published
on this blog, or you can subscribe via email
using the link shown at the top left of each page or by entering your email address in the form below.
After submitting your email address, you'll receive an email requesting confirmation of your subscription,
and will need to click the link in the email before your email subscription becomes active.
Your email address will not be shared, and will not be used for any purpose other than
to send you notification of updated content.
You can unsubscribe at any time using the unsubscribe link in the bottom of each email.
posted Tuesday, 21 May 2013, 19:40 (+0800), by Martin
This is the eleventh article in a
series on "understanding your camera"
that I am writing as I teach camera basics and camera operation to my children.

Metering the Scene
The metering mode determines how your camera will measure the brightness of the scene
being photographed to determine the
exposure.
Modern DSLR cameras support a number of different metering modes, and it is important
to understand how the different modes work, and when the different modes should be used.
This article describes how each of the metering modes works, and also provides some details
on selecting which metering mode to use in different situations.
Metering Modes
Below is a list of the metering modes supported by most modern DSLR cameras
and mirrorless cameras, along with the icons used to indicate these metering modes.
Not all cameras support all these modes, and some camera manufacturers use slightly different
terminology for the modes.
|
Evaluative Metering / Matrix Metering / Multi-segment Metering
|
|
|
How It Works:
Your camera will meter the entire frame to determine the exposure required.
To achieve this, the camera splits the frame into a number of sections, evaluates each section separately.
The exposure readings of the sections nearest to the active focus point are weighted more heavily
than other exposure readings from other sections, and the camera then analyses
the resulting exposures for each section to determine the over-all exposure for the scene.
When To Use It:
This is a general-purpose metering mode, suited for most conditions, and is the default mode
on most DSLR cameras.
When full-auto mode or any basic (portrait, landscape, macro, etc) modes
are selected, most (all?) DSLR cameras will revert to this metering mode.
|
Spot Metering
|

|
How It Works:
This mode will cause the camera to meter using a smaller portion of the frame,
typically 1.5-3.5%, depending on the camera model.
For most DSLR cameras, spot metering uses the centre of the frame.
With Canon, Sony and Pentax DSLR cameras, spot metering always uses a small portion of the frame at the centre
(the Canon 1D series of DSLR cameras are the only exception).
Nikon DSLR cameras behave a little differently, with spot metering using a small portion of the frame
centred on the currently selected focus point.
When To Use It:
Spot metering is useful for metering on a specific part of a subject or scene,
especially if the scene has a lot of contrast, with either bright or dark portions.
|
Partial Metering
|

|
How It Works:
The camera meters a small portion at the centre of the frame,
typically 5-10%, depending on the camera model.
When To Use It:
Similar to spot metering, this mode can be useful when you want to meter on a specific part of the scene,
but where the area being metered is larger.
|
Centre-Weighted Average Metering
|

|
How It Works:
This mode will use meter the entire frame, but will assign a greater weight to the metering from the centre
of the frame.
When To Use It:
This is a general-purpose metering mode, useful when the scene being photographed is lit quite evenly,
and the subject is in the centre of the frame.
This mode is largely redundant, as evaluative metering provides better results in most conditions.
|
posted Tuesday, 15 May 2012, 20:20 (+0800), by Martin
This is the tenth article in a
series on "understanding your camera"
that I am writing as I teach camera basics and camera operation to my children.
Confusion about Focal Length
A reader of one of my earlier posts in this series, titled
Focal Length, Field of View and Angle of View Defined,
left a
comment
indicating he was somewhat confused by what I had written about focal length.
The commenter, Luis, wrote
I am confused. Some books define focal point as the point where rays parallel to the optical axis converge
(the point that burns when you focus the sun on a piece of paper), and focal length as the distance from the center of the lens to that point.
Also, the rules given in books to construct the image by tracing the rays locate the image away from the focal point.
That is, if you place the film or the sensor at the focal point (as defined above), you don't get any image.
I will be grateful if you clarify what is actually your definition of focal length.
Rather than respond to Luis' questions in another comment, I thought I would explore and respond to his questions in this
blog post.
posted Friday, 20 January 2012, 23:07 (+0800), by Martin
This is the ninth article in a
series on "understanding your camera"
that I am writing as I teach camera basics and camera operation to my children.

Definition
Let me start with a definition of "depth of field".
Wikipedia defines "depth of field" as
"the distance between the nearest and farthest objects in a scene that appear acceptably sharp in an image".
If the entire image is sharp (ie, all in focus), it has a large depth of field.
If an image has the foreground sharp, while the background is blurred, it has a small depth of field.
A small depth of field is also referred to as "shallow focus", and a large depth of field is also known as "deep focus".
The term "depth of field" is often abbreviated as "DOF".
Factors Affecting Depth of Field
There are a number of factors that affect the depth of field in a photo.
- Distance between camera and subject
Shorter distance = less DOF; longer distance = more DOF.
The further the camera is away from the subject, the more DOF you will get.
This is one of the reasons macro photography is challenging. With very short distances between the camera
and the subject, the depth of field tends to get very small.
- Focal length
Longer focal length = less DOF; shorter focal length = more DOF.
Longer focal lengths mean less DOF, which is one of the reasons why longer length lenses can be
great for portraiture photography.
- Aperture
Larger aperture = less DOF; smaller aperture = more DOF.
Opening up the aperture reduces the DOF, while stopping down the aperture increases the DOF.
A "fast" lens with a larger maximum aperture
(say, f/2.8 or larger) allows a smaller depth of field to be achieved
than a kit lens with a maximum aperture of f/4.
- Format size (ie, sensor size in a digital camera, film size in a film camera)
Larger sensor = less DOF; smaller sensor = more DOF.
Full-frame DLSR cameras provide smaller depth of field than a crop-sensor DSLR.
Point-and-shoot cameras, with their tiny sensors, typically struggle to provide a small depth of field.
(This is due to the format size affecting the circle of confusion,
but that is a complex topic that I will leave for a future post.)
Here are some photos demonstrating different depth of field by varying only the aperture.
Both photos were taken from exactly the same location. The first photo shows a very short depth-of-field
due to the use of a large aperture, which causes the (distracting) background to be completely blurred.
The second photo shows a much larger depth-of-field due to a much smaller aperture.
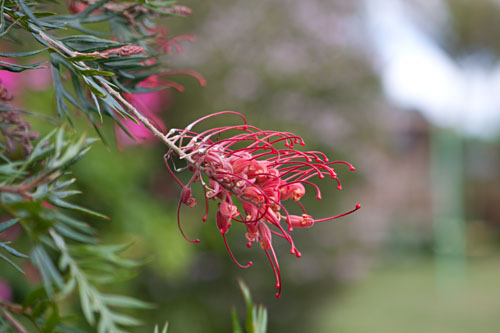
very short depth-of-field due to lens being wide open at a large aperture of f/2.8
Canon EOS 50D, 24-70mm f/2.8L @70mm, 1/400 sec, f/2.8, ISO100
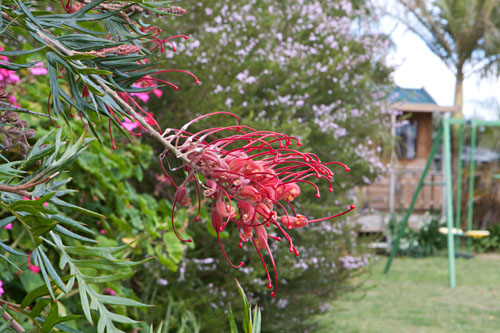
larger depth-of-field due to lens being stopped down to a small aperture of f/22
Canon EOS 50D, 24-70mm f/2.8L @70mm, 1/30 sec, f/22, ISO640
Why You Should Think About Depth of Field
Shallow depth of field will draw the viewer's eye to a specific part of the image,
typically desired in portrait photography.
Conversely, deep depth of field ensures all components of the image are in focus,
which is typically desired in landscape photography.
Understanding the factors that affect depth of field allow you to
be aware of the impact of varying any of those factors, and thus
have more control over the depth of field in your photos.
Because depth-of-field is one of the key aspects I like to control in my photography,
most of my photos are taken with the
mode
set to aperture priority.
This allows me to choose the
aperture,
rather than allowing the camera to select the aperture.
posted Thursday, 14 April 2011, 21:04 (+0800), by Martin
This is the eighth article in a
series on "understanding your camera"
that I am writing as I teach camera basics and camera operation to my children.

Introduction
In the previous article in this series,
I discussed the
various modes
available on most cameras, from the fully automatic modes to the semi-automatic modes,
creative modes, and manual mode.
Don't Believe the "Manual Only" Brigade
There are plenty of people who believe you are not a photographer unless
you always use manual mode.
For someone who is relatively new to a DSLR camera, the idea of using manual
mode can be a bit daunting, especially when you are struggling to come to terms
with the concepts of
exposure,
aperture,
and you are still learning your way around the controls of your camera.
I don't have anything against the people who choose to use manual mode.
However, I do have a problem with the people who insist manual mode is the only way
to use a DSLR camera.
Let the Camera Do the Hard Work
Modern digital cameras contain a lot of electronics that can make
smarter and faster decisions about exposure than you can.
Rather than having to choose the
ISO,
aperture
and
shutter speed manually,
let the camera take control of one or more of those parameters, while you
set the parameter(s) that are important.
Let the camera do most of the work, and you can then adjust the
exposure up or down a little, if required, using
exposure compensation.
This will allow you to focus on actually taking the photo, the composition, and capturing the moment,
rather than fiddling with the camera's controls to get the right exposure in manual mode.
This is especially true for people who are still learning the controls on their DSLR camera,
where adjusting aperture, shutter speed and ISO isn't second nature, and you haven't yet figured out
how to do it blind-folded, with one arm behind your back.
posted Tuesday, 22 March 2011, 20:45 (+0800), by Martin
This is the seventh article in a
series on "understanding your camera"
that I am writing as I teach camera basics and camera operation to my children.

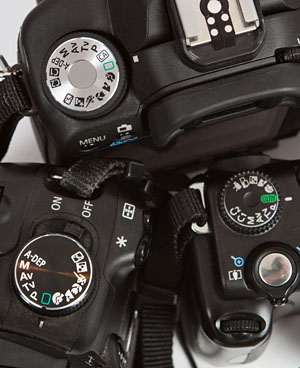
camera mode dials, all set to auto
(clockwise from top: Canon 50D DSLR,
Canon G5 point-and-shoot, Canon 350D DSLR)
Introduction
SLR cameras and many point-and-shoot cameras have a mode dial, allowing you to select one of a number
of different modes, depending on the conditions and how you want the camera to respond.
However, many people do not understand the different modes, and leave their camera in the fully automatic mode
all the time.
It is important to understand
exposure, and what the camera is doing
when you take a photo, and that is the reason why I'm looking at the different modes.
What's Wrong with Auto Mode?
In full auto mode, the camera is making almost all the decisions about the exposure
( aperture,
shutter speed
and ISO),
and has to guess what you want.
In many situations, you are much better off using some of the other modes available on your
camera, as it will allow you to make decisions about some of the variables,
while still (optionally) allowing the camera to make decisions about other variables.
In this post, I look at each of the modes available on most cameras, and
provide some information about how the camera reacts when configured to use that mode.
(Note that I am more familiar with Canon cameras, so some references are specific to Canon
cameras. However, the description of the modes is just as applicable to other
brands of cameras.)
|
|