posted Friday, 21 March 2008, 21:50 (+0800), by Martin

Digital tilt-shift effects can be digitally applied to a photo, to give it the appearance of being a miniature model. I've previously blogged a tilt-shift photo of South Perth.
The photo below shows a ferry heading into South Perth, with the Perth city skyline in the background, and has been digitally tilt-shifted using the advanced technique described below (click image for a larger version).
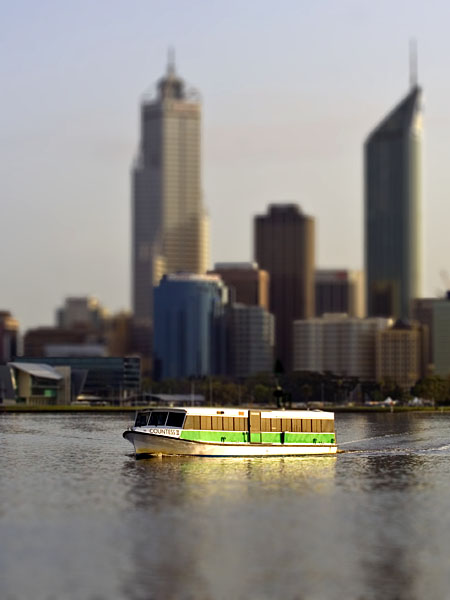
ferry approaching South Perth
South Perth, Western Australia
Canon EOS 350D, 70-200mm f/4L @70mm, 1/500 sec, f/8, ISO100
Canon EOS 350D, 70-200mm f/4L @70mm, 1/500 sec, f/8, ISO100
This blog entry provides details on how to easily apply a basic tilt-shift effect to a photo, as well as details on a more advanced technique (using Photoshop CS2) that provides more realistic-looking miniaturised tilt-shift photos.
While the basic tilt-shift effect can be very effective on many photos, it will often result in a very artificial look on any photos that have objects orthogonal to the mask direction.
For example, the ferry photo shown above has multiple city buildings, and if the basic tilt-shift effect was applied, the top of the buildings would be very much out of focus, while the bottom would be in focus. This is not natural, as the entire building is the same distance from the camera, and hence should have the same amount of blur applied to the entire building.
An excellent fake tilt-shift photo titled Eiffel Tilt-Shift II on flickr.com made me think about making more complex masks when blurring, to provide a more realistic miniaturised look.
I've detailed the process for applying an advanced tilt-shift effect to photos below.
The original image used to create the tilt-shift image is shown below:
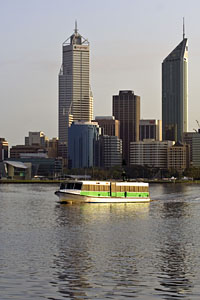
original photo
Tilt-Shift Definition
Tilt-shift photography relies on the lens being tilted/shifted relative to the camera body. Tilt-shift lenses were originally designed to correct perspective when taking photos of buildings, and various tilt-shift lenses are available for DSLR cameras, but they are rather pricey (ie, the Canon TS-E 24mm f/3.5L retails for AUD$1500+).
Landscape photos taken from a distance typically have most of the frame or the entire frame in focus, with the lens at infinity focus. Because tilt-shift photos only have a small amount of the photo in focus, it allows the photographer to draw the viewer's attention to a specific part of the photo.
The tilt-shift effect also causes photos to look as if they are miniature models, due to the unnaturally short depth-of-field, when our eyes are expecting everything in the frame to be in focus.
Rather than spending many dollars on a tilt-shift lens, you can emulate the effect digitally in Photoshop.
Applying Tilt-shift Effect (basic)
There are many tutorials on the web that describe how to apply a basic tilt-shift effect to your photos. The Fake Model Photography tutorial is a good one to use for Photoshop.
Alternatively, if you don't have Photoshop, there's a guide to doing Fake Tilt-Shift with The Gimp, as well as a guide for Using Photoshop Elements 3 to create the tilt shift effect.
Applying Tilt-shift Effect (advanced)
Note that this tutorial assumes the use of Photoshop CS2.
Also note that saving the image as a Photoshop file (ie, .PSD) will save the layer mask, thus allowing you to save the image as a work-in-progress, and then re-open it at a later date, and continue where you left off.
To create an advanced tilt-shift effect:
- Open Starting Image
- Create New Empty Layer
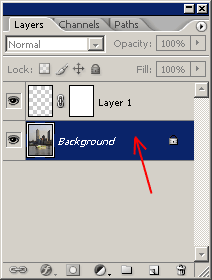
Create a new empty layer for the mask by clicking the "create new layer" button at the bottom of the "layers" tool window, or by selecting the Layer -> New -> Layer menu, or by hitting Shift+Ctrl+N.
Creating a new layer ensures the quick mask will be saved when the PSD file is saved, as applying a quick mask without the new layer will result in the mask being lost when saving the PSD file. - Create Layer Mask in New Layer
Create a layer mask in the newly created layer by hitting the "add layer mask" button at the bottom of the "layers" tool window, or by selecting the Layer -> Layer Mask -> Reveal All menu item.

- Quick-Mask Edit Mode
Turn on quick-mask editing by selecting the "edit in quick-mask mode" button in the main tool window, or hit "Q" to toggle between standard mode and quick-mask mode.
- Select Default Colours
Select the default foreground (white) and default background (black) colours by hitting hit the "D" key. - Select Gradient Tool
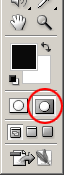
Select the gradient tool by hitting the "G" key to toggle between the paintbrush and the gradient tool. - Select Reflected Gradient
Select the "reflected gradient" by hitting the forth gradient sub-tool in the top toolbar.

- Apply Gradient
Using gradient tool, click and drag, starting at area that you want in focus, and drag up approximately 1/4 of the image height. Note that this will take some trial and error to get good results, so don't be scared to just give it a try.
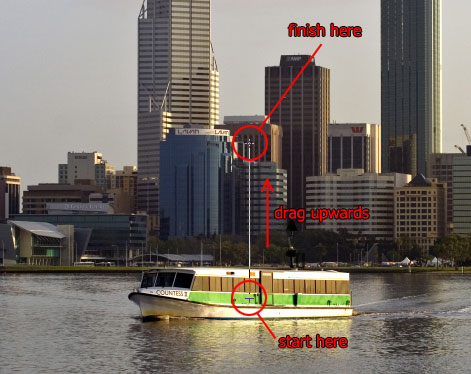
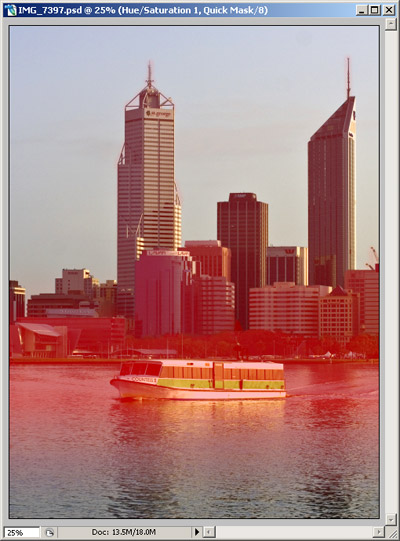
The result should show the areas to be in focus as 50% red, and the areas to be fully blurred as untouched, as shown below.
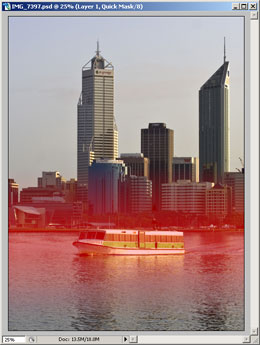
In this particular case, the plane to be in focus is right where the ferry is located, and is horizontal. This focus plane needs to be applied to elements in the photo that are the same distance from the camera, so in some cases, it won't be horizontal. If that's the case, your gradient click-and-drag will need to be at an appropriately orthogonal angle to the focus plane. - Check the Results
Before proceeding with editing the mask, it's worth checking the effect of the gradient you have created by applying the lens blur filter to it.
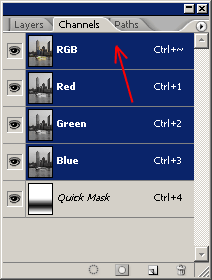
To apply the blur filter to the actual image, first select the "background" layer (ie, containing the original image), and then select the RGB channel (once the "background" layer has been selected, you can hit Ctrl-~ to select the RBG channel).
Then select the Filter -> Blur -> Lens Blur menu item.
On the resulting filter dialog, specify "Quick Mask" in the "Depth Map Source", and adjust the shape, radius, etc, as per the screenshot below.
Adjustments can be made to these settings if you want to tweak the blur effect.
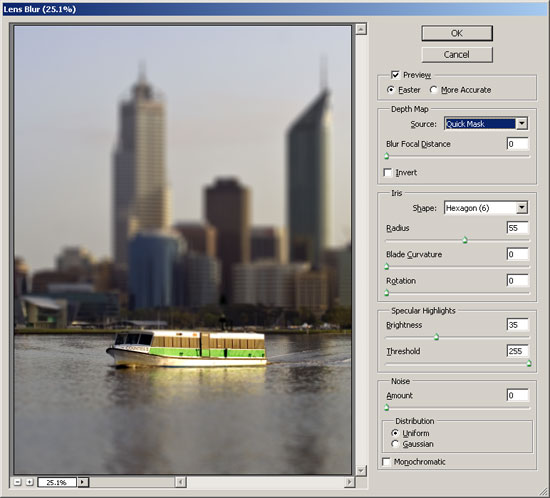
Hit the "cancel" button to return to the image without applying the blur filter (we want to adjust the mask first!).
If you're not happy with the location and size of the initial gradient mask, just select the layer containing the mask, and re-apply the gradient. - Editing the Mask
To edit the mask, select the layer containing mask (ie, "layer 1"), and use the paintbrush tool to paint parts of the mask in different shades of red. Use the eyedropper tool (alt-click when the paintbrush tool is selected) to select the appropriate mask colour from existing parts of the mask.
The important thing is to mask items that are the same distance from the camera in the same mask colour. In the image below, each building has been individually masked with the same colour, as the entire building is (relatively speaking) the same distance from the camera, and we want to apply the same level of blur to the entire building.
During this process, you may want to periodically check the results by temporarily applying the lens blur filter, as described in step 9 above.
Note that if there's a plain background (ie, the sky) behind the item that you're masking out, you don't have to be too neat with your masking, and can overlap onto the sky somewhat. With the mask shown above, the front buildings had to be masked neatly, while the masking of the taller buildings in the rear didn't have to be as neat (ie, the masking over the antennas on the top of the tallest buildings spills over the sky).
Be sure to periodically check the results by applying the lens blur, to check the results of the masking, and you may find you'll need to adjust your masking to achieve the best results. - Save Your Work
Periodically save your work. Saving the work-in-progress as a PSD file will preserve the original image on the background layer, and will also preserve the layer mask, allowing you to continue where you left off. - Final Mask
Here's the final mask, which can be viewed by turning off the RGB channel.
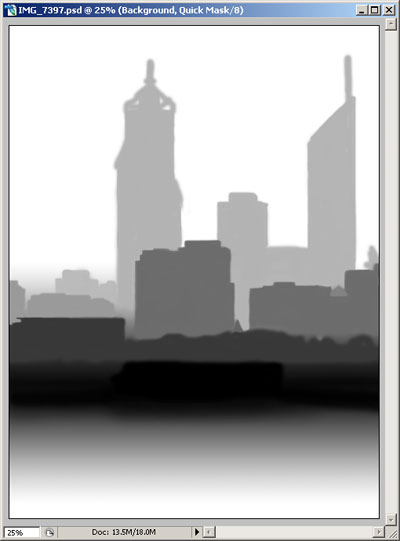
Viewing the raw mask in this way can be useful, as seeing the mask without the busy background allows you to easily see parts of the mask that may not have been fully painted out. - Apply Lens Blur
Once you're happy with the results of the mask editing, apply the lens blur filter, as described in step 9, but hit the "OK" button instead of the "Cancel" button to close the filter dialog and apply the mask.
If you want to keep a copy of the original image without the blur filter applied, you may want to make a copy of the background layer, and then apply the filter to the copied layer, thus preserving a copy of the original image in one layer. This will allow you to revisit the masking at a later date, if desired, and then reapply the blur filter using a modified mask.
Alternatively, keeping a copy of the original photo (ie, RAW file or JPG straight out of the camera) is also an option. - Turn Off Mask Channel
When you're satisfied with results of the blur filter, go to the "Channels" tool window, and turn off the "Quick Mask" channel to hide the red mask. - Adjust Contrast, Saturation and Sharpen
To further emphasise the miniaturised look, boost the saturation and contrast of the image.
Resize the image to a web-friendly size (if intended for the web), and apply some sharpening using the USM filter. Sharpening should always be the last action you perform on an image. last - Final Image
Here's the final image. Hold the cursor over the image to see the non-tilt-shifted version, and click the image to view a larger tilt-shift version.
References
- Wikipedia: Tilt-shift Photography
- Wikipedia: Tilt-shift miniature faking
- Fake Model Photography (a tutorial)
This image is available for purchase as a high-quality card, matted print, mounted print, canvas print or framed print
from redbubble.com.


Hey Martin,
Excellent tutorial. Thanks for pointing to my flickr image.
I have yet to test it, but I have a hunch that PS blurs differently depending of whether an object is in front of the focus plane or to the back of it. This is why I used a depth map with black being closest, white farthest and then used the picker in the Lens Blur effect to select the correct gray value to be in focus. Do you think that could make a difference where the foreground has more objects than in the boat picture above?
cheers,
Arnar