|
My Old Mast & Antenna Installation
This page details the installation of a mast and antenna at my previous house,
providing me with a connection to the Martin Mast access point.
See here for details of the mast at my current house.
Parts Required
We used the following bits and pieces:
- 6.5m galvanised pipe (50mm external diameter)
- 2m and 3m galvanised pipe (32mm external diameter)
- modified Conifer (ex Galaxy) 24dBi antenna
- 2 guy wires
- 2 eye bolts
- assorted ubolts and nuts and bolts
- coax
- silicone
I had previously obtained several 3m masts (including guy wires)
when I was collecting Conifer antennas from people's roofs.
The eye bolts were purchased from a local hardware store, and I used about 10m
of CNT-400 coax.
A PC with an Enterasys
RoamAbout wireless card, and an SVEC
WL-123 PCMCIA to PCI adapter,
running Red Hat 7.3, was targetted for use as a wireless router.
Testing
The Node Database
provides shows the location of access points, and also provides compass bearings,
distances, and elevation diagrams, and indicated that I should have line-of-sight
from my house to the Martin Mast access point.
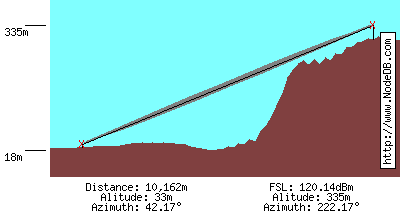
elevation diagram from the Node Database
However, once I got on the roof with a compass, it was evident that trees
were going to be a big problem.
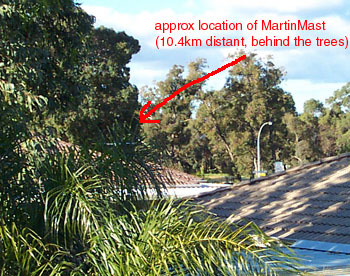
looking towards the Martin Mast from the shed roof
Some testing indicated that the large tree visible in the photo above
blocked my line-of-sight to the Martin Mast from most of my property, but I
managed to get a signal from on top of my shed roof, in the corner of my
property.
Installation
I ordered a 6.5m length of galvanised pipe from my local metal supplier
(medium duty, 40mm nominal diameter, 50mm external diameter, 3.5mm wall thickness),
and bolted the antenna to the end, of it, and raised the mast next to my
shed, using some 50mm u-bolts to attach it to the side of the shed.
u-bolt through the side of the shed
The u-bolts were used to firmly attach the mast to the structural
angle-iron frame of the shed.
looking at the same u-bolt from inside the shed
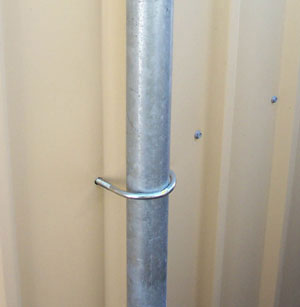
Prior to raising the mast, a u-bolt had been used to attach the guy
wires to the mast.
the guy wires attached to the mast
The eye-bolts were screwed into the structural frame near the corners of the
shed roof, and the two guy wires attached to the u-bolts.
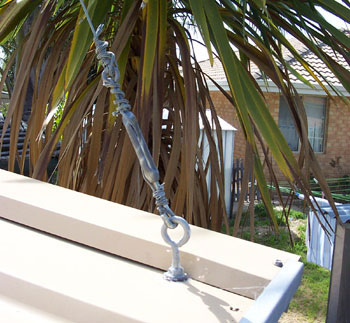
the guy wire attached to the eye bolt
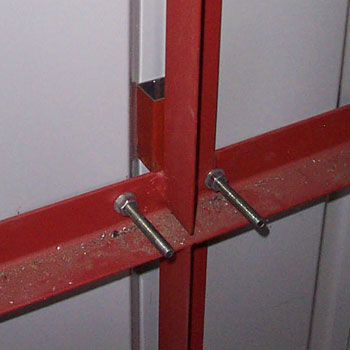
As the mast was very close to the corner of my property, it wasn't possible
to have a guy wire on one side, so I used a solid support, attached to
the shed roof.
the solid support bolted to the shed roof
The coax was connected to a PC with a wireless card, and the antenna
was carefully aimed to maximise signal strength.
However, I was only getting an SNR of about 6-7dB, sigificantly less than
what I was expecting.
Some testing with another make-shift mast indicated I could more than
double my signal strength by raising the antenna by another 1.5m,
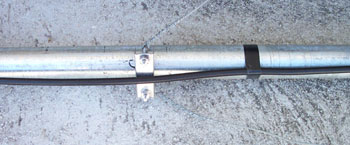
so the mast came down, and a 1.5m extension was added to the top.
the join in the mast
The antenna was then placed back into position, with the antenna now
8m above the ground.
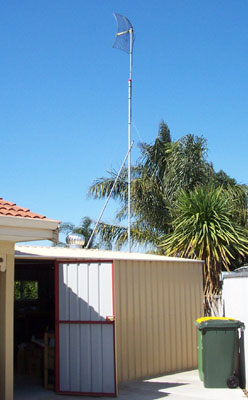
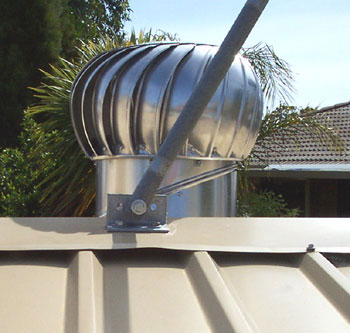
the installed mast
The SNR is typically 10-11dB, certainly a significant improvement.
A 3dB increase is a doubling
in signal strength (it's a log scale), and I'm consistently getting
4dB better SNR that I was getting previously.
The dipole modification used (where the dipole is
rebuilt from scratch using copper and brass) is definitely one reason
why I'm getting reasonable signal strength through the trees
- careful testing
indicates it provides double the signal strength of the more common dipole
modification (where the PCB dipole is retained, and the coax soldered directly onto it).
I decided to compare the sensitivity of all my RoamAbout wireless cards, and
interestingly enough, found that one of my cards showed approx 4dB less noise.
I swapped cards, with a resulting increase of approx 4dB in the SNR. The SNR
now averages approx 13.5 dB.
References
Modifying Conifer Antennas for Wireless Networking
Conifer Antenna Testing
Wireless Link Monitoring with RRDTool
last updated 22 Oct 2013
|
|

